Grilling a whole beef tenderloin is an art form that only a few have mastered. The tantalizing aroma, the juicy tenderness, and the rich flavors make it the ultimate centerpiece for any special occasion. But what if we told you that achieving perfection on the grill is easier than you think? Are you ready to uncover the secrets that will elevate your grilling skills and impress your guests?
In this ultimate guide, we will unravel the top tips and techniques for grilling-roasting a whole beef tenderloin to absolute perfection. From selecting the finest cut of meat to carving and serving, we will walk you through each step of the process. Get ready to become a master of the grill and create a mouthwatering masterpiece that will leave everyone craving for more.
Choosing the Right Beef Tenderloin
When it comes to grilling-roasting a whole beef tenderloin, the quality of the meat is of utmost importance. By selecting the perfect beef tenderloin, you can ensure a delicious and memorable culinary experience. We recommend looking for a high-quality cut of meat that meets the following criteria:
- Well-Marbled: Look for a beef tenderloin that has a good amount of marbling throughout the meat. Marbling refers to the streaks of fat that are evenly distributed, resulting in enhanced tenderness and flavor.
- Bright Red Color: A high-quality beef tenderloin should have a vibrant, bright red color. This indicates freshness and ensures that the meat will be tender and juicy when cooked.
When you find a well-marbled tenderloin with a bright red color, you can be confident that you are starting with a premium cut. The marbling will contribute to the meat’s tenderness, while the bright red color signifies its freshness and high quality.
Remember, the quality of the beef tenderloin you choose will directly impact the taste and texture of your final dish. So, take your time to select the perfect beef tenderloin and elevate your grilling-roasting experience.
| Quality Criterion | Description |
|---|---|
| Well-Marbled | Look for streaks of fat throughout the meat, ensuring enhanced tenderness and flavor. |
| Bright Red Color | A vibrant, bright red color indicates freshness and guarantees tender and juicy meat when cooked. |
Preparing the Beef Tenderloin
Before grilling, it is important to properly prepare the beef tenderloin. This step ensures that the meat will be tender, juicy, and full of flavor. Here are the essential steps to follow:
Trimming Excess Fat and Silver Skin
Start by trimming any excess fat and silver skin from the beef tenderloin. This step is crucial because excess fat can inhibit the absorption of flavors and lead to uneven cooking. Use a sharp knife to carefully remove the fat and silver skin, ensuring that the meat is clean and ready for seasoning.
Tying the Tenderloin
To promote even cooking and help the beef tenderloin retain its shape, it is recommended to tie the meat with butcher’s twine. This process ensures that the tenderloin cooks evenly throughout and maintains a uniform shape. Start by folding the thin end of the tenderloin underneath itself to create a more uniform thickness. Then, tightly tie the tenderloin with butcher’s twine at regular intervals along its length.
Seasoning the Tenderloin
Seasoning is a critical step in preparing the beef tenderloin for grilling. Generously season the meat with a mixture of salt, pepper, and your favorite herbs and spices. This will enhance the flavor profile and create a delicious crust on the exterior of the tenderloin during cooking.
Pro Tip: For an extra burst of flavor, consider marinating the beef tenderloin before seasoning. This can infuse the meat with additional herbs, spices, and marinade of your choice. Remember to pat the tenderloin dry before seasoning to ensure proper browning during grilling.
By following these steps for preparing the beef tenderloin, you will set yourself up for a successful and delicious grilling experience. The trimmed, tied, and seasoned tenderloin will cook evenly, resulting in a mouthwatering centerpiece for your meal.
Setting up the Grill for Indirect Heat
To grill-roast a whole beef tenderloin, we need to set up the grill for indirect heat. This technique ensures slow, even cooking and gives us control over the level of doneness. Follow these steps to create the perfect grilling environment:
- Create a Two-Zone Fire: Preheat one side of the grill to medium-high heat for the hot sear zone. Leave the other side unlit for the cooler indirect heat zone. This setup allows for two distinct cooking zones and helps achieve the desired results.
- Hot Sear Zone: The hot sear zone is where we’ll sear the beef tenderloin to develop a delicious crust. It’s important to get this zone really hot, as it will help lock in the juices and add the desired charred flavor.
- Cooler Indirect Heat Zone: The cooler indirect heat zone is where we’ll cook the tenderloin to its desired internal temperature. This zone provides gentle, indirect heat, promoting even cooking and preventing the exterior from burning.
With the two-zone fire setup, we can easily maneuver the beef tenderloin between the sear zone and the indirect heat zone to achieve the perfect cooking method. The combination of direct heat searing and indirect heat cooking ensures a juicy and perfectly cooked beef tenderloin.
Now, let’s move on to the next section to learn how to grill-roast the beef tenderloin to perfection.
| Grill Setup | Benefits |
|---|---|
| Two-Zone Fire |
|
| Hot Sear Zone |
|
| Cooler Indirect Heat Zone |
|
Grilling-Roasting the Beef Tenderloin
Once the grill is set up to perfection, it’s time to embark on the grilling-roasting journey of the beef tenderloin. This method combines the flavors of grilling and roasting to create a juicy and tender masterpiece.
Begin by searing the meat on all sides over the hot sear zone. This process locks in the natural juices and develops a delicious crust, adding a depth of flavor to the tenderloin. Utilizing indirect heat allows for even cooking and prevents flare-ups that could char the meat.
Move the seared beef tenderloin to the cooler indirect heat zone on the grill. This gentle cooking method ensures that the meat is cooked evenly from the inside out, resulting in a succulent and juicy main course. Close the lid of the grill to create an oven-like environment that further enhances the tenderness of the tenderloin.
Cook the beef tenderloin until it reaches the desired internal temperature. Use a meat thermometer to accurately monitor the progress and ensure perfect doneness. The ideal internal temperature for a medium-rare beef tenderloin is around 135°F (57°C), while a medium doneness is around 145°F (63°C). Adjust the cooking time accordingly to achieve your preferred level of doneness.
Pro Tip: Allow the meat to rest for about 10 minutes after grilling-roasting. This resting period not only allows the juices to redistribute but also ensures a more tender and flavorful final result.
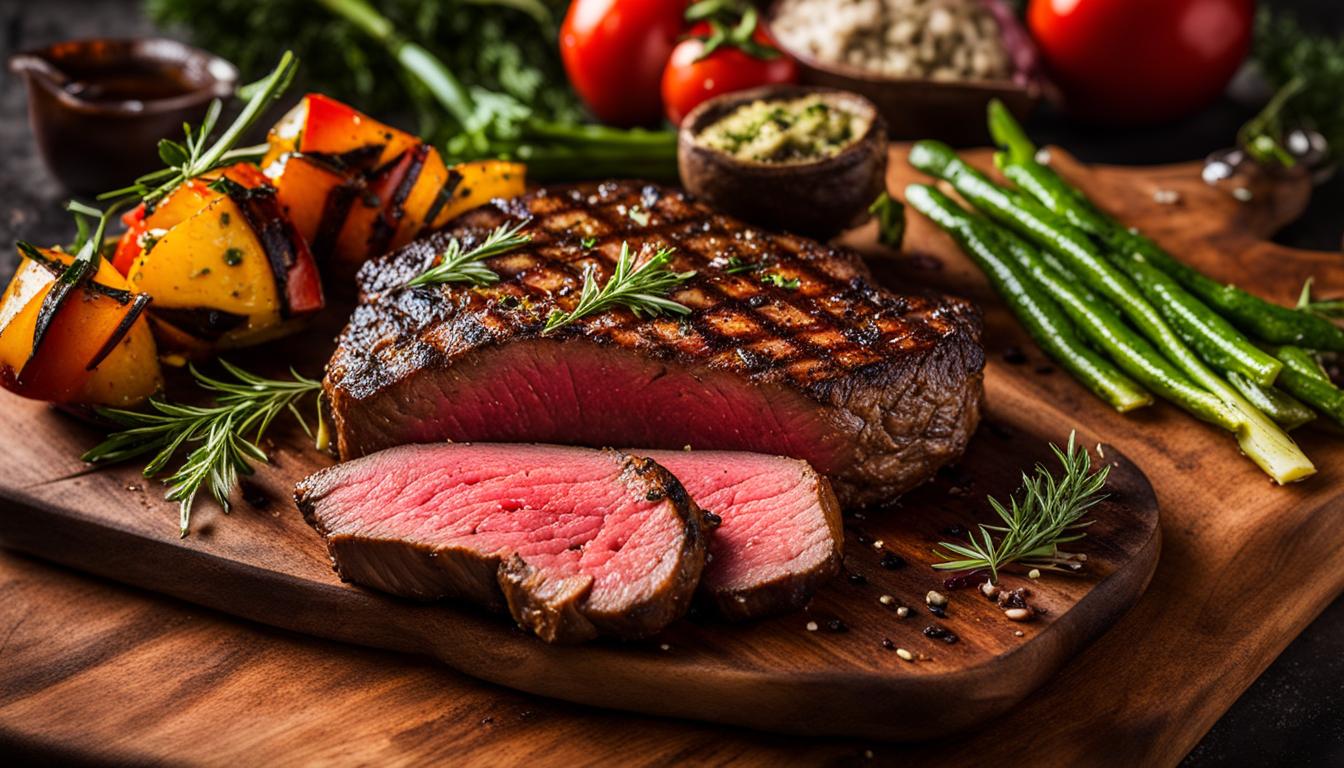
Once the beef tenderloin has reached the desired internal temperature and has rested, it’s time to carve it into thick, juicy slices. Remember to remove the butcher’s twine before slicing to ensure an elegant presentation. Serve the grilled-roasted beef tenderloin immediately, and prepare to delight your taste buds with its melt-in-your-mouth texture and rich flavors.
Grilled-Roasted Beef Tenderloin Cooking Time Guide:
| Doneness Level | Internal Temperature | Cooking Time (Approximate) |
|---|---|---|
| Medium Rare | 135°F (57°C) | 20-25 minutes per pound |
| Medium | 145°F (63°C) | 25-30 minutes per pound |
| Medium Well | 150°F (66°C) | 30-35 minutes per pound |
Resting and Carving the Beef Tenderloin
After grilling-roasting, it is important to let the beef tenderloin rest for about 10-15 minutes. Resting the beef tenderloin allows the juices to redistribute throughout the meat, resulting in a moist and flavorful final dish.
During the cooking process, the heat causes the juices in the meat to move towards the center. By allowing the tenderloin to rest, we give the juices time to redistribute back into every part of the meat. This ensures that every bite is juicy and succulent.
While the tenderloin is resting, it’s a good time to untie the butcher’s twine used to secure the meat. Carving the tenderloin properly is important to maintain the tenderness and presentation of the meat.
Start by carefully removing the twine, making sure not to disturb the shape of the tenderloin. Then, using a sharp carving knife, slice the tenderloin into thick, juicy pieces. It’s best to cut against the grain, which will result in more tender slices.
Remember to carve the tenderloin just before serving to preserve the heat and juices. Serve your perfectly cooked beef tenderloin immediately to wow your guests with its mouthwatering flavor.
| Resting and Carving the Beef Tenderloin |
|---|
| Rest the beef tenderloin for 10-15 minutes to allow the juices to redistribute. |
| Remove the butcher’s twine used to secure the tenderloin. |
| Carve the tenderloin into thick, juicy slices using a sharp carving knife. |
| Serve immediately to enjoy the moist and flavorful meat. |
Tips and Techniques for Grilling the Perfect Beef Tenderloin
Grilling the perfect beef tenderloin requires some expert tips and techniques. To ensure a mouthwatering result every time, we’ve compiled our top recommendations for grilling beef tenderloin to perfection.
1. Choose the Right Tenderloin
Start with a high-quality beef tenderloin that is well-marbled and has a bright red color. The marbling will provide optimal tenderness and flavor in the final dish.
2. Prep the Tenderloin
Before grilling, trim any excess fat and silver skin from the tenderloin. Tie the meat with butcher’s twine to promote even cooking and help it retain its shape. Season the tenderloin with a mixture of salt, pepper, and your favorite herbs and spices.
3. Set Up the Grill for Indirect Heat
Create a two-zone fire on your grill. Preheat one side to medium-high heat for the hot sear zone, while leaving the other side unlit for the cooler indirect heat zone. This setup allows for slow, even cooking.
4. Sear and Cook Over Indirect Heat
Start by searing the beef tenderloin on all sides over the hot sear zone to develop a delicious crust. Then, move the meat to the cooler indirect heat zone and close the lid. Cook the tenderloin until it reaches the desired internal temperature.
5. Use a Meat Thermometer
To ensure the perfect level of doneness, use a meat thermometer to monitor the internal temperature of the beef tenderloin. Aim for 135°F (57°F) for medium-rare, 145°F (63°C) for medium, or adjust according to your preference.
6. Let it Rest and Carve
After grilling, let the beef tenderloin rest for about 10-15 minutes. This allows the juices to redistribute, resulting in a moist and flavorful meat. Untie the butcher’s twine and carefully carve the tenderloin into thick, juicy slices.
Remember, practice makes perfect when it comes to grilling beef tenderloin. With these tips and techniques, you’ll be well on your way to grilling the perfect beef tenderloin every time.

Serve and Enjoy!
After all the hard work, it’s time to serve and enjoy the grilled-roasted beef tenderloin. Present it as the perfect centerpiece for your meal and savor the succulent and flavorful meat. Whether it’s a backyard barbecue or a special occasion, this dish is sure to impress your guests and leave them wanting more.
When serving beef tenderloin, slice it into thick, juicy pieces that showcase the beautiful pink center. Arrange the slices on a platter or individual plates, and garnish with fresh herbs for added aroma and visual appeal. The tender and juicy meat will melt in your mouth, delivering a burst of rich flavors with each bite.
Pair your perfectly grilled beef tenderloin with your favorite side dishes, such as roasted vegetables, mashed potatoes, or a fresh salad. The tenderloin’s succulent and flavorful meat will complement any accompaniments, creating a well-rounded and satisfying meal.
Remember to take a moment to appreciate the masterpiece you’ve created. The grilled-roasted beef tenderloin is not only a delicious dish, but also a centerpiece that brings people together. Enjoy the company of your loved ones as you indulge in this culinary delight.