Are you tired of dry and tasteless pork chops? Do you want to learn the secrets to cooking the perfect pan seared pork chop that is juicy, flavorful, and guaranteed to impress your dinner guests? Look no further! In this article, we will guide you through every step of the process, from choosing the right cut of meat to achieving a mouthwatering sear. Say goodbye to disappointing pork chops and say hello to culinary mastery!
Whether you are a seasoned home cook or a beginner in the kitchen, our easy dinner recipe will equip you with the knowledge and techniques to create the most succulent pork chop you’ve ever tasted. Discover the importance of selecting the perfect cut of pork chop, learn how to properly prepare the meat for cooking, and uncover the secrets to achieving that crave-worthy sear.
So, are you ready to take your pork chop cooking skills to the next level? Let’s dive in and unlock the secrets to perfectly juicy pan seared pork chops that will leave everyone asking for seconds!
The Importance of Choosing the Right Cut of Pork Chop
When it comes to cooking the perfect pan seared pork chop, choosing the right cut of meat is crucial. Opt for bone-in pork chops as they tend to have more flavor and are juicier than boneless ones. Additionally, consider the thickness of the chop. Thicker chops, around 1 inch or more, will have a juicier interior and a crispy exterior when seared properly.
Preparing the Pork Chops for Cooking
Before cooking the pork chops, it’s important to prepare them properly to ensure a delicious and perfectly seared result. Follow these steps to achieve mouthwatering pork chops:
- Remove the pork chops from the fridge and allow them to rest at room temperature for 15-30 minutes. This helps ensure more even cooking throughout the meat.
- Using paper towels, pat the pork chops dry. This step removes any excess moisture that can hinder the searing process and result in steaming instead.
- If desired, score the fat rind on the pork chops. This technique helps the chops cook more evenly by allowing the heat to penetrate the meat.
- Generously season both sides of the pork chops with salt and pepper. This simple seasoning enhances the flavor of the meat and adds a delightful taste to every bite.
Now that your pork chops are properly prepared, they are ready to be seared to perfection. The next section will guide you through the process of achieving a flawless sear on your pork chops.
Achieving the Perfect Sear
To achieve a perfect sear on the pork chops, it is essential to use a hot skillet. Preheat a cast iron skillet until it is lightly smoking. This will ensure a nice crust on the outside of the chops. Add a small amount of oil to the skillet and heat it for a few minutes.
Place the seasoned pork chops in the hot skillet and cook for 3-5 minutes per side, depending on the thickness of the chops. The goal is to achieve a golden brown color and ensure they are cooked through.
For a crispy pork chop, make sure to flip each side only once during the cooking process. This will help to develop a flavorful crust without overcooking the meat. Avoid moving or pressing down on the chops too much as this can prevent proper browning.
Remember, the searing process creates a delicious crispiness on the outside while retaining a tender and juicy interior. The seared pork chop technique adds both texture and flavor to your dish, elevating it to a whole new level.
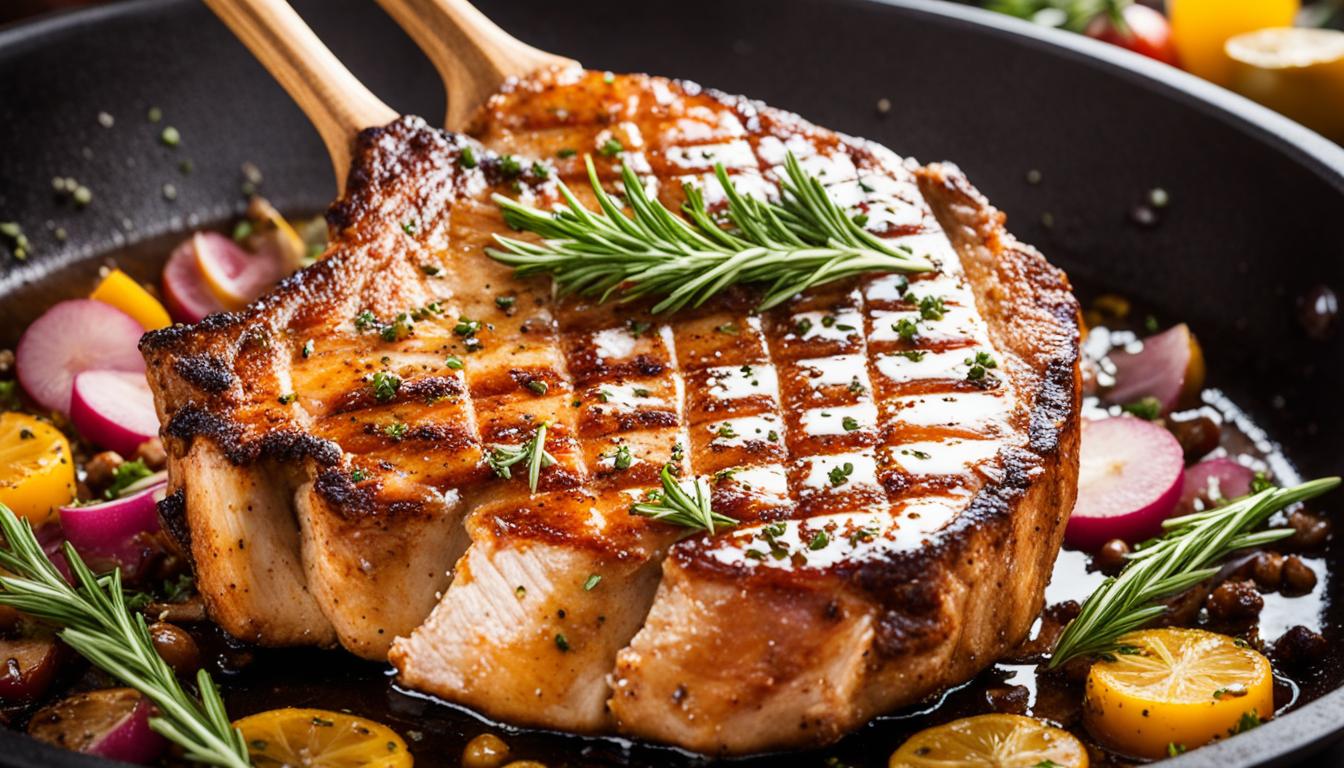
Check out the mouthwatering image below to see what a perfectly seared pork chop looks like:
Next, we’ll discuss how to test for doneness and the importance of resting the pork chops before serving.
Testing for Doneness and Resting the Pork Chops
To ensure that the pork chops are cooked to perfection, it’s important to test their doneness. The best way to do this is by using an instant-read meat thermometer. The safe internal temperature for pork is 145°F. However, for juicy and tender chops, it’s recommended to remove them from the skillet when they reach around 140°F as the temperature will continue to rise during the resting period.
Resting the cooked pork chops is a crucial step in the cooking process. It allows the juices to redistribute within the meat, resulting in a moist and tender chop. Simply transfer the cooked chops to a plate or cutting board and let them rest for a few minutes before serving. This short resting period will help ensure that each bite is flavorful and satisfying.
By testing for doneness and allowing the pork chops to rest, you can guarantee that your pan seared pork chops are cooked to perfection, retaining all their juicy and savory qualities.
The Benefits of Resting
Resting meat is an essential part of the cooking process that is often overlooked. During cooking, the heat causes the juices within the meat to move towards the surface. Resting allows these juices to redistribute back into the meat, resulting in a more flavorful and moist chop. It also helps to ensure that the meat retains its tenderness instead of becoming dry and tough.
Additionally, resting the pork chops gives you time to prepare any accompanying dishes or sauces, allowing everything to be ready at the same time. This ensures a seamless and enjoyable dining experience.
Remember, patience is key when it comes to cooking pork chops. By testing for doneness and allowing the meat to rest, you’ll be rewarded with mouthwatering pan seared pork chops every time.
Tips and Troubleshooting
Here are some additional tips for cooking perfect pan seared pork chops:
- Ensure the skillet is hot enough: Before adding the pork chops, make sure your skillet is thoroughly heated. If the chops are not cooking within the suggested timeframes, it’s likely that your skillet may not be hot enough.
- Utilize cooking tongs: Using cooking tongs can make it easier to flip the pork chops without damaging them. This ensures that they cook evenly on both sides, resulting in a delicious, well-seared chop.
- Focus on the fat rim: If the fat rim on the side of the pork chop isn’t quite cooked enough, you can take a simple step to enhance its texture and flavor. With tongs, hold the pork chop just above the hot oil and immerse the fat directly into the oil until it turns brown.
- Sear larger pork chops in batches: If you’re cooking larger pork chops, it’s best to sear them in batches rather than overcrowding the pan. This allows for better heat distribution and ensures that each chop gets a beautiful sear on the outside.
By following these tips, you’ll be able to overcome common challenges and achieve perfectly cooked, flavorful pan seared pork chops every time.
Recommended Cuts and Cooking Times
For the juiciest and most flavorful pan-seared pork chops, opt for bone-in cuts. Blade chops, rib chops, and center-cut chops are recommended options. The cooking time will vary depending on the thickness of the chops.
- Thinner chops (around ¾ inch) will require about 3 minutes per side.
- Thicker chops (up to 1 inch) will need around 5 minutes per side.
Use an instant-read meat thermometer to test for doneness and ensure that the pork chop is cooked to perfection.
Choosing the Right Cuts
When it comes to juicy and flavorful pan-seared pork chops, the cut of meat plays a significant role. Opting for bone-in cuts adds extra flavor and juiciness to the meat. Blade chops, rib chops, and center-cut chops are highly recommended for their exceptional taste and texture.
Cooking Times
The cooking times for pan-seared pork chops depend on the thickness of the cut. Thinner chops, measuring around ¾ inch, will require about 3 minutes per side. Thicker chops, up to 1 inch, will need approximately 5 minutes per side to ensure they are cooked to perfection.
The Benefits of Dry-Brining
Dry-brining is a simple yet effective technique that can take your pork chops to the next level of juiciness and flavor. Unlike traditional brining, which involves submerging the meat in a liquid solution, dry-brining entails heavily salting the meat and letting it rest uncovered in the refrigerator.
So, what makes dry-brining so beneficial for achieving flavorful and juicy pork chops? The answer lies in the science behind it. When you generously salt the meat and allow it to sit, the salt draws out moisture from the chops. However, rather than leaving the meat dry, the moisture gets reabsorbed along with the salt, resulting in a more succulent and well-seasoned chop.
One of the key advantages of dry-brining is that it helps the pork chops retain their natural juices. The salt acts as a denaturant, changing the protein structure in a way that allows the meat to hold onto more moisture during the cooking process. As a result, you’ll be left with pork chops that are incredibly tender and juicy, even after they’ve been cooked.
Another noteworthy benefit of dry-brining is the concentrated flavor it imparts to the pork chops. The salt not only enhances the natural taste of the meat but also infuses it with delicious savory notes. As the moisture is reabsorbed, the salt seeps into the meat, creating a perfect balance of flavors that will delight your taste buds.
Dry-brining is particularly advantageous for pork chops, as it avoids diluting the flavor that a liquid brine can sometimes cause. Additionally, it prevents the meat from becoming too watery when cooked, ensuring the final result is moist and full of flavor.
If you’re ready to take your pork chop game to the next level, give dry-brining a try. It’s a simple and effective technique that will elevate the juiciness and flavor of your pork chops to new heights.

Benefits of Dry-Brining:
- Enhances juiciness and flavor
- Allows pork chops to retain natural juices
- Concentrates flavor for a more satisfying taste
- Avoids dilution of flavor caused by liquid brines
- Prevents meat from becoming too watery when cooked
Thick-Cut Pork Chops for Optimal Flavor and Texture
When it comes to pan searing pork chops, using thick-cut chops (at least 1.5 inches) is recommended. Thicker chops allow for a better balance between a crisp crust and a juicy interior. The extra thickness also helps to retain moisture during the cooking process, resulting in a more flavorful and tender chop. Opt for rib chops cut from the blade end for the best flavor and ease of searing.
Conclusion
With the right technique and attention to detail, you can achieve the perfect pan-seared pork chops every time. By choosing the right cut of meat and properly seasoning, searing, and testing for doneness, you can enjoy juicy and flavorful pork chops that are crispy on the outside and tender on the inside. Whether you’re cooking for a weeknight dinner or a special occasion, this easy dinner recipe is sure to impress.
Experiment with different seasonings and sides to create a delicious and satisfying meal that suits your taste. Whether you prefer classic flavors like rosemary and garlic or want to add a spicy twist with chili powder and cumin, the possibilities are endless. Serve your pan-seared pork chops with roasted vegetables, mashed potatoes, or a fresh salad to complete the meal.
So, next time you’re looking for a delectable and foolproof dish, try out this perfect pan-seared pork chop recipe. Follow the steps outlined in this article, and you’ll be rewarded with juicy and flavorful pork chops that will have your guests begging for seconds. Whether you’re a beginner in the kitchen or an experienced cook, this recipe is sure to become a staple in your repertoire. Bon appétit!