You know that familiar satisfaction of biting into a crisp and creamy Oreo, right? But have you ever wondered if you could recreate that iconic taste at home? We’re here to tell you that you absolutely can! In this article, we’re going to guide you through the process of making your very own homemade Oreos using the tried-and-true recipe from BraveTart. Trust us, these DIY Oreos are not just another cookie; they’re a delicious copycat of that classic treat we all know and love. So, let’s dive in and discover the secrets to making the perfect homemade Oreo cookies!
The Joy of Making Homemade Oreos
The allure of homemade Oreos lies in the satisfaction of making something by hand. There’s something undeniably fulfilling about creating these popular cookies from scratch, using simple ingredients and following an easy process. When we bake Oreos at home, we indulge in the pleasure of working with real butter and sugar, experiencing the joy of the dough coming together beautifully in our hands.
What makes homemade Oreos truly special is the comfortingly familiar taste they deliver. By using a combination of high-quality ingredients, we are able to recreate the beloved flavors of the classic Oreo cookies. Each bite offers the perfect balance of crispy wafers and creamy filling, evoking a sense of nostalgia and familiarity.
The process of making homemade Oreos is surprisingly straightforward and can be completed in less than an hour. With just a handful of simple ingredients and minimal special equipment required, it’s an accessible recipe that anyone can tackle. Whether you’re an experienced baker or a novice in the kitchen, homemade Oreos offer a delicious twist on a well-loved favorite.
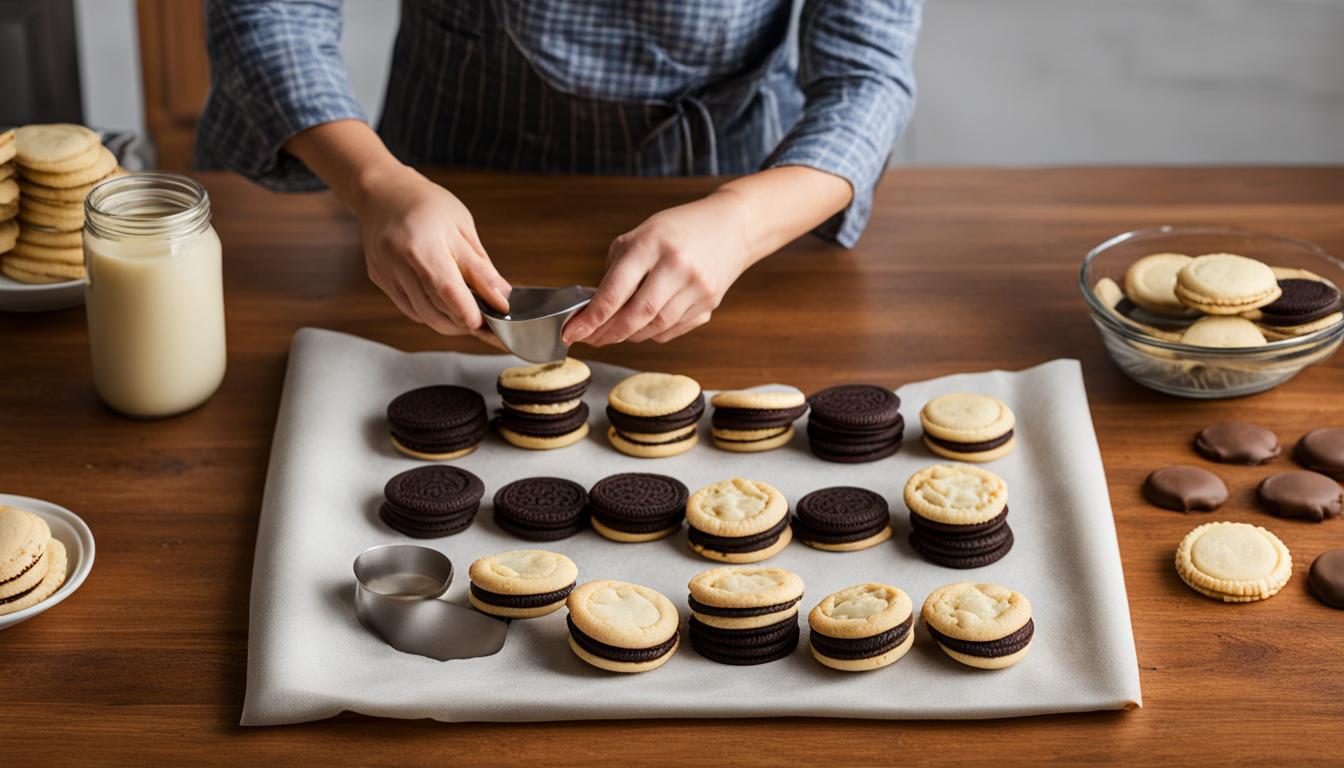
To amplify the joy of creating homemade Oreos, we’ve included an image below that showcases the delightful process. Take a look:
As you can see, the image captures the essence of the satisfying hands-on process involved in making these cookies.
So, why not roll up your sleeves and embrace the joy of making homemade Oreos? Discover the satisfaction of creating something from scratch, relish in the comfortingly familiar taste, and enjoy the simple and easy process that brings these delightful cookies to life.
Perfecting the Cookie Dough
The key to creating the perfect homemade Oreo cookies lies in the cookie dough itself. Our homemade Oreo cookie dough recipe combines a carefully chosen selection of key ingredients to ensure a delectable treat. Let’s dive into the details.
The Key Ingredients
Our homemade Oreo cookie dough begins with a combination of butter, sugar, and golden syrup. This unique trio not only adds sweetness but also imparts a subtle caramel note to the dough. Additionally, the golden syrup acts as a binding agent, keeping the eggless dough together during the baking process.
To achieve the distinct flavor and appearance of Oreo cookies, we use a special blend of high-fat Dutch-process cocoa powder and all-purpose flour. For the best results, we recommend incorporating a wheat flour blend, which strikes a perfect balance between protein and starch, resulting in a delightful texture.
Rolling the Dough with an Embossed Rolling Pin
Once the dough is prepared and kneaded until smooth, it’s time to shape the cookies. To achieve the iconic Oreo appearance, the dough is divided in half and rolled with cocoa powder. For an added decorative touch, you can use an embossed rolling pin, creating beautiful patterns on the dough. This step not only enhances the visual appeal but also ensures that the cookies have a crisp and delicate texture.
Now that we have perfected the cookie dough, it’s time to move on to baking the perfect wafers. Let’s explore the process of achieving those dark, fragrant, and crispy Oreo cookies.
Baking the Perfect Wafers
When it comes to baking homemade Oreo wafers, achieving the perfect balance of flavor and appearance is key. To maintain their dark and inky black color, it’s important to follow the proper baking time and temperature. We recommend baking the wafers at 350°F (180°C) for approximately 15 minutes. However, keep in mind that the exact baking time may vary depending on the thickness of the dough.
As the wafers bake, you’ll notice a beautiful transformation. Starting off reddish-brown, they gradually darken to an alluring inky black color. Unlike traditional baked goods, these wafers don’t rely on the typical visual cue of “bake until golden brown.” Instead, focus on the sensory indicators. The wafers should be fragrant and firm to the touch when they are fully baked, ensuring the desired texture and maintaining their dark appearance.
To add visual appeal to this section and showcase the allure of homemade Oreos, we have included an image below:
By carefully monitoring the baking time and temperature, you’ll be rewarded with wafers that possess not just a rich and deep color, but also a fragrant and firm texture. These characteristics, combined with the homemade Oreo’s signature taste, will ensure a delightful cookie that satisfies with each bite.
Creating the Perfect Filling
When it comes to homemade Oreos, the filling is the key to achieving that classic taste we all love. By combining butter and powdered sugar, we create a luscious and flavorful filling that perfectly complements the chocolate wafers.
To ensure the filling reaches a thick and creamy consistency, we use the melted butter method. This involves melting the butter and simmering it to remove any water content. The resulting mixture, when combined with powdered sugar, creates a smooth and creamy paste that is easy to work with.
Once our filling is ready, we can start assembling our homemade Oreos. We pipe the filling onto half of the wafers, making sure to distribute it evenly. Then, we sandwich the remaining wafers on top, gently pressing them together to create a delicious cookie sandwich.
One of the great advantages of this homemade filling is its room temperature stability. Unlike store-bought Oreos that can become soft and squishy, our homemade version maintains its thickness and stability even at room temperature. This means you can confidently pack them for lunch or store them in a cookie jar without worrying about the filling losing its consistency.
For visual appeal and optimal flavor, we recommend using an embossed rolling pin to create decorative patterns on the wafers. This adds an extra touch of elegance to your homemade Oreos.
With our homemade Oreo filling, you can enjoy the same level of satisfaction as store-bought Oreos. The creamy, flavorful filling combined with the delicate and crispy wafers creates the perfect cookie experience. Whether you enjoy them on their own or dunk them in a glass of milk, these homemade Oreos are sure to satisfy your sweet tooth.
Enjoying Homemade Oreos
Indulge in the delightful experience of homemade Oreo cookies, featuring the perfect combination of delicate and crispy wafers and a lusciously creamy filling. These irresistible treats can be savored on their own, but for the ultimate nostalgic experience, pair them with a tall glass of milk for a classic dunking adventure that is sure to transport you back to childhood.
The homemade Oreos capture the essence of this beloved cookie, offering a satisfying alternative to their store-bought counterparts. With each bite, you’ll savor the crispy texture of the wafer, which effortlessly gives way to the smooth and creamy filling. It’s a truly blissful combination that keeps you coming back for more.
To enhance your homemade Oreo experience, follow these simple steps:
- First, admire the cookies’ appearance, appreciating the beautifully dark and tempting wafers that have been carefully baked to perfection. The rich, inky black color invites you to take a bite, promising an indulgent treat.
- Next, take a moment to appreciate the contrasting textures as you sink your teeth into the crispy wafer. Experience the delicate crunch and the way it gives way to the velvety smoothness of the filling.
- As you enjoy each bite, allow yourself to be transported to simpler times, where milk and cookies were the ultimate comfort. The combination of the homemade Oreo’s crispy wafers and creamy filling is a nostalgic reminder of those carefree moments.
- For a truly authentic experience, grab a glass of cold milk and dunk your homemade Oreo. Feel the wafer soften slightly, while the milk enhances the flavors and creates a creamy, sweet sensation in each mouthful.
- Lastly, savor the moment. Close your eyes and enjoy the familiar taste and texture of the classic Oreo cookie, elevated by the love and care put into making it from scratch. The homemade Oreos offer a sense of accomplishment and a dose of pure satisfaction.
With homemade Oreos, you can recreate a cherished childhood treat while adding your own personal touch. The perfect balance of crispy wafers, creamy filling, and the option to dunk them in milk makes these cookies an irresistible homemade indulgence. So go ahead, bake a batch, and enjoy the simple pleasure of homemade Oreo cookies.
Recipe and Additional Notes
For those eager to recreate the indulgent delight of homemade Oreos, we have the perfect recipe for you. Gather the following ingredients: unsalted butter, sugar, golden syrup, baking soda, salt, all-purpose flour, Dutch-process cocoa powder, and powdered sugar. Prepare to embark on a delicious baking adventure.
To start, mix the dough by combining the softened butter, sugar, and golden syrup. Add in the baking soda, salt, all-purpose flour, and Dutch-process cocoa powder. Knead the dough until it becomes smooth and pliable. Divide it in half and roll each portion into a thin sheet, dusting with cocoa powder to achieve that signature dark appearance.
Cut out small rounds from the rolled dough and bake them for about 15 minutes at 350°F (180°C) until they become fragrant and firm. While the wafers cool, prepare the filling by melting butter and simmering it to remove water content. Combine the melted butter with powdered sugar until it forms a thick and creamy paste. Pipe the filling onto half of the cooled wafers and sandwich them with the remaining wafers, allowing the filling to set.
Additional notes to consider: If you prefer a less sweet wafer, you can reduce the quantity of sugar in the recipe. For a decorative touch, use an embossed rolling pin when rolling out the dough. Lastly, store your homemade Oreos in an airtight container at room temperature for maximum freshness. Now, it’s time to savor the delectable results of your homemade Oreo creation.