If you’ve ever wondered how to make a delicious pie crust that is flaky and full of flavor, look no further. We have the answer to your pie-making dreams. The best old fashioned flaky pie dough recipe is a classic and reliable way to achieve a perfect crust every time. Whether you’re a seasoned baker or a novice in the kitchen, this recipe will guide you through the process step by step.
So, what’s the secret? How can you achieve that golden, buttery crust that crumbles with every bite? Stick around as we reveal the techniques, ingredients, and tips that will take your homemade pies to the next level. Get ready to impress your family and friends with your flaky pie crust prowess.
How to Achieve Flaky Pie Crust
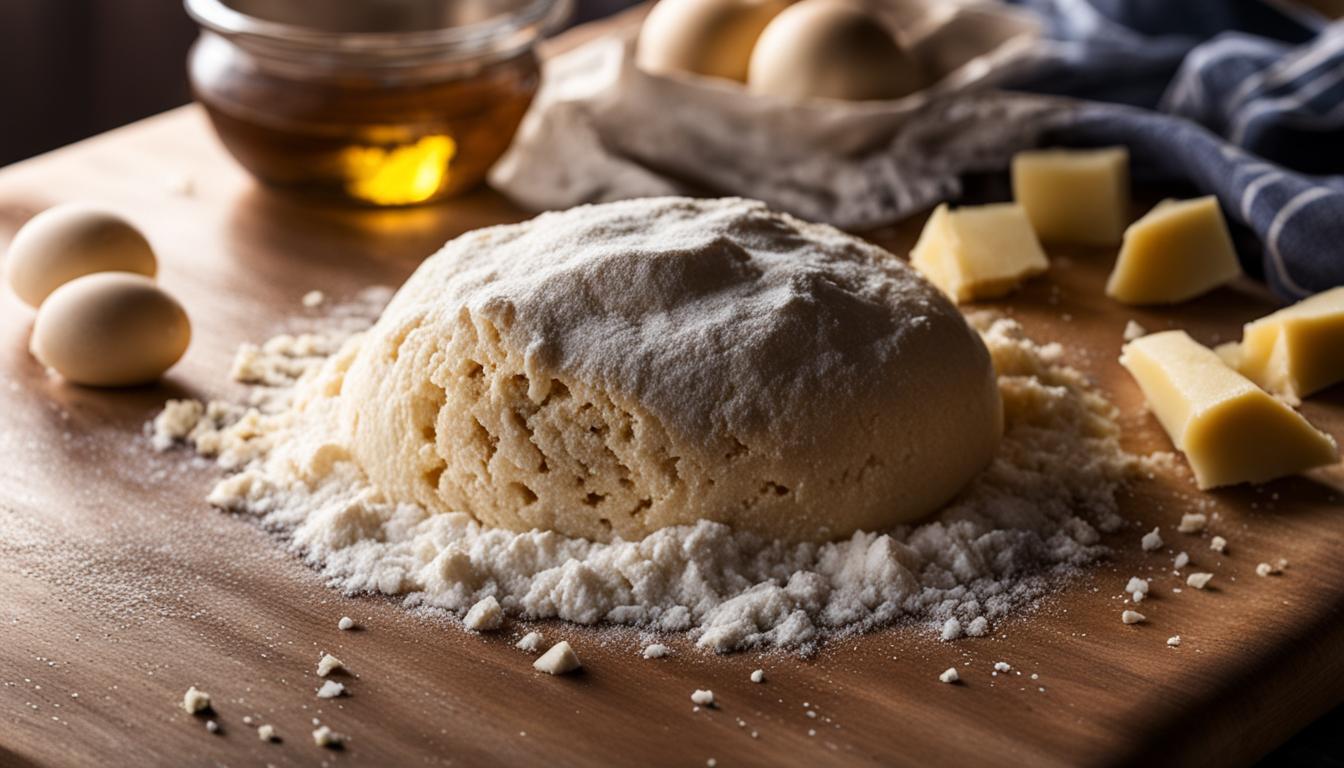
Achieving a flaky pie crust requires the right technique and ingredients. To start, using all-purpose flour is key as it provides the necessary strength to hold the crust’s shape during baking. It’s also important to follow a blitz-style ratio of flour to butter, creating a pliable yet strong dough.
Folding the dough is a crucial step in achieving flakiness. Each fold creates layers, resulting in that sought-after texture. Remember, the more layers, the flakier the crust.
After shaping the dough, refrigeration is a must. Chilling the dough helps preserve those important layers and ensures a flaky texture. So be sure to give your dough some time in the refrigerator to work its magic.
Ingredients for Homemade Pie Crust:
- All-purpose flour
- Butter
- Water
- Salt
Easy Pie Dough Recipe:
- In a mixing bowl, combine the all-purpose flour and salt.
- Add chilled butter cubes and cut them into the flour using a pastry cutter or your fingertips, until the mixture resembles coarse crumbs.
- Sprinkle cold water over the flour mixture, a tablespoon at a time, and mix until the dough comes together. Be careful not to overmix.
- Divide the dough in half and shape into two discs. Wrap each disc in plastic wrap and refrigerate for at least 30 minutes.
- When ready to use, roll out the dough on a floured surface to fit your pie dish.
Creating a flaky pie crust doesn’t need to be complicated. With the right ingredients and technique, you can achieve a traditional pie crust that will impress your family and friends. So why not give this easy pie dough recipe a try?
The Importance of Gluten and Butter in Pie Dough
When it comes to creating a vintage pie dough or classic pie pastry, understanding the role of gluten and butter is essential. Many people mistakenly believe that gluten is the enemy of pie dough, but in reality, it is what gives the dough its strength and binds the crust together.
Achieving the perfect balance of ingredients is key. A 1:1 ratio of flour to butter ensures a flexible and tender crust. The butter not only adds rich flavor but also plays a crucial role in preventing the bottom crust from becoming soggy. It creates a slight waterproofing effect, keeping the filling from seeping through.
The combination of gluten and butter in the dough results in a texture that is both strong and flaky. The gluten provides structure while the butter adds richness and tenderness. This harmonious blend is what makes vintage pie dough and classic pie pastry so delectable.
To fully appreciate the magic of gluten and butter in pie dough, it’s important to experience it firsthand. Try your hand at a traditional recipe that incorporates these classic ingredients and enjoy the delicious results.
The Science Behind Gluten and Butter
Gluten, a protein naturally present in wheat flour, develops when the flour mixes with liquid. It forms an elastic network that gives the dough structure and strength. As the dough bakes, the gluten network holds its shape, resulting in a sturdy crust.
Butter, on the other hand, contributes fat to the dough. Fat coats the flour particles, preventing them from absorbing too much water. This inhibition of water absorption helps to limit gluten formation. The fat also creates layers within the dough, which translates to flakiness in the finished crust.
By striking the perfect balance between gluten and butter, you can create a pie crust that is both reliable and full of flavor. So next time you embark on a pie-making adventure, remember the importance of these two key ingredients.
The Technique for Flaky Pie Dough
Creating a flaky pie dough requires a specific technique that involves smashing and folding. To achieve the desired flakiness, we start by cutting cold butter into cubes and tossing them with flour. Each cube of butter is then flattened, ensuring that it is evenly distributed throughout the dough.
Next, we knead the dough until it forms a lumpy ball. The inclusion of butter acts as a binder, preventing the gluten from becoming too powerful and resulting in a tough crust. As a result, our pie dough remains tender and flaky.
After kneading, we roll out the dough on a floured surface, ensuring it is evenly distributed. We then fold the dough, creating layers that contribute to the flaky texture we desire. Rolling out the dough again after folding further enhances these layers, resulting in an impressive flakiness when baked.
By following these instructions for the technique of flaky pie dough, you can achieve a crust that is not only visually appealing but also irresistibly flaky. Try it with our Old Fashioned Apple Pie Recipe for a delicious homemade treat!
Tips for Rolling and Handling Pie Dough
Rolling and handling pie dough properly is essential for a successful flaky crust. We want to share some expert tips to help you achieve the best results with your homemade pies. Follow these steps to create a pie crust that is both delicious and visually appealing.
1. Choose the Right Rolling Pin
When it comes to rolling out pie dough, choosing the right rolling pin can make a big difference. We recommend using a rolling pin that feels comfortable in your hands and provides good control. Whether you prefer a wooden or a marble rolling pin, select one that suits your preferences and helps you achieve the desired thickness for your crust.
2. Roll Just Slightly Larger Than Needed
It’s important to roll the dough just slightly larger than the size of your pie dish. This allows for some extra dough to hang over the edges, which you can then trim and crimp for a neat and decorative finish.
3. Create Flakiness with Folding
To achieve that coveted flaky texture, try incorporating some folding techniques into your pie dough preparation. After rolling out the dough, fold it in half, then into a quarter. This process helps create layers, resulting in a light and airy crust.
4. Keep the Dough Cool
Keeping the dough cool while rolling is crucial for maintaining its structure and preventing it from becoming too sticky or warm. If at any point the dough starts to feel sticky, simply place it back in the refrigerator for a few minutes to chill. This will make it easier to work with and prevent it from sticking to your rolling pin or work surface.
5. Divide and Transfer with Ease
When you’re ready to transfer the dough to the pie dish, divide it into portions for the top and bottom crusts. This makes it easier to handle and prevents any stretching or tearing. Gently transfer each portion to the pie dish, pressing it gently into place and ensuring it fits snugly against the sides.

By following these tips and techniques, you’ll be well on your way to creating the best possible pie crust. Remember to always refer to your chosen recipe for specific instructions, as different pie fillings and crust variations may require slight adjustments. With practice and patience, you’ll soon be baking delicious pies with a flaky crust that will impress all who try it!
The Importance of Chilling and Baking the Pie Dough
Chilling the pie dough is a crucial step in creating the perfect flaky crust. It allows the gluten to relax and the layers to set, resulting in a tender and delicate texture. We recommend refrigerating the dough for at least two hours, but if you have the time, overnight chilling is even better. This extended chilling period allows the flavors to meld and the dough to become more cohesive.
Before baking, it’s essential to protect the edges of the crust to prevent them from burning. You can use aluminum foil or a pie crust shield to cover the edges while allowing the center to bake to a beautiful golden brown. Venting the top crust is also important to allow steam to escape and prevent the filling from becoming too soggy. You can create decorative vents or simply cut slits in the crust.
To achieve a beautifully browned crust, an egg or milk wash can be brushed over the pie dough before baking. This will give the crust a shiny and golden appearance. Make sure to follow the baking instructions provided in the recipe, including the recommended temperature and baking time. These guidelines will ensure that your pie crust bakes evenly and to perfection, with a delightfully flaky texture.