Are you searching for the perfect recipe to make crispy and delicious old fashioned latkes for Chanukah? Look no further! Whether you’re a latke aficionado or new to this iconic Jewish dish, we’ve got you covered. From the traditional recipe to expert tips and techniques, we’ll guide you through the process of creating latkes that are crispy on the outside and tender on the inside. Get ready to impress your family and friends with these mouthwatering potato pancakes!
Continue reading to discover the secrets behind the definition of a latke, the essential ingredients for perfect latkes, frying techniques, tips and tricks for preparation, secrets to achieving ultimate crispiness, choosing the right oil, recommended equipment, and cooking techniques. Plus, we’ll share serving and storing suggestions to make the most of your latkes throughout the holiday season.
The Definition of a Latke
To understand what sets a latke apart from a regular potato pancake, it’s important to know the defining characteristics of a latke. A latke should have a deeply browned crust with wispy, lacy edges. The interior should be plump and slightly cakey, with rustic strands of potato intertwined with onion. While there may be variations in thickness and crispiness, these key elements define a true latke.
If you’re unsure how a latke should look, imagine a golden-brown pancake with a delicate, crispy exterior, revealing tender, fluffy potato strands and hints of savory onion on the inside. This classic dish is a crowd-pleaser during Chanukah and beyond.
While traditional latkes call for a simple combination of grated potatoes and onions, modern variations may include additional ingredients like grated zucchini, carrots, or even cheese. These additions can add unique flavors and textures, but the essence of a latke lies in its crispy edges, rustic strands of potato, and harmonious blend of flavors.
The Ingredients for Perfect Latkes
When it comes to making perfect latkes, the key is in the ingredients. The combination of potatoes, onions, and a binder creates the foundation for these delicious potato pancakes.
For the best results, it is recommended to use russet potatoes due to their high starch content, which produces tender interiors. The globe-shaped Spanish yellow onions add a distinct flavor to the latkes, enhancing their overall taste.
The binder is what holds the latkes together and adds flavor and texture. It consists of eggs, matzo meal, and potato starch. The eggs provide richness, flavor, and binding properties, ensuring that the latkes stay intact during cooking. Matzo meal, a traditional ingredient, absorbs excess moisture without turning the latkes into a gluey mess.
During the preparation process, the potatoes naturally release starch, which contributes to the binding of the latkes. This liberated potato starch is an essential component that helps the latkes achieve the desired texture and hold their shape.
To get a better idea of these ingredients, take a look at the image below:
Frying Techniques for Perfect Latkes
The frying process is a crucial step in achieving perfectly crisp latkes. To ensure optimal results, it’s recommended to use a cast iron pan, known for its superior heat retention and ability to produce a deep, burnished crust. When frying latkes, it’s important to use enough oil to ensure even cooking and prevent them from becoming greasy.
When selecting the oil for frying, canola or peanut oil are preferred due to their high smoke points. These oils can withstand high temperatures without compromising the flavor of the latkes or burning their exteriors. It’s crucial to maintain the correct oil temperature throughout the frying process to achieve the desired results.
To maintain the correct oil temperature, it’s recommended to use a thermometer specifically designed for measuring oil temperature. This will help prevent the oil from becoming too hot or too cold. (Here’s a handy guide on how to measure oil temperature: [link to another article]).
When frying latkes, heat the oil to approximately 365°F (185°C) before adding the latkes to the pan. This temperature ensures that the latkes cook evenly and develop a crispy exterior without burning. If the oil is too cold, the latkes will absorb more oil and become greasy. On the other hand, if the oil is too hot, the exteriors of the latkes may brown too quickly while the interiors remain undercooked.
It’s important to note that different oils have different smoke points. Canola oil and peanut oil have high smoke points, making them suitable for frying at high temperatures. This is especially important when frying latkes, as they require high heat to achieve the desired level of crispiness.
Be sure to monitor the oil temperature throughout the frying process and adjust the heat as needed to maintain a consistent temperature. This will ensure that each batch of latkes is fried to perfection, resulting in crispy, golden brown exteriors and tender interiors.
By using the proper frying techniques and selecting the right oil for the job, you can ensure that your latkes turn out perfectly crisp and delicious. Now that we’ve covered the frying techniques, let’s move on to the next section, where we’ll explore tips and tricks for preparing the latke mixture.
Tips and Tricks for Latke Preparation
In order to simplify the preparation process and achieve consistent results, there are a few tips and tricks that can help make your latkes turn out perfectly every time.
Using a Food Processor and Grating Disk
A food processor with a grating disk is highly recommended for grating the potatoes and onions. This allows for quick and efficient grating, creating large, firm shreds of potatoes that contribute to the texture of the latkes. Simply load the potatoes and onions into the food processor and let it do the work for you.
Removing Excess Moisture
Excess moisture in the shredded potatoes can lead to soggy latkes. To remove this moisture, a starch liberation technique can be used. After shredding the potatoes, place them in a cheesecloth and squeeze out as much liquid as possible. Collect the released starch, which is valuable for binding the latkes together, and add it back to the latke mixture.
Proper Draining and Oil Quantity
It’s important to properly drain the shredded potatoes to ensure the latkes cook evenly and achieve optimal crispiness. Use a draining rig, such as a sheet pan layered with paper towels, to catch any excess moisture while the latkes are being shaped and fried.
Additionally, when frying the latkes, it’s crucial to use enough oil and maintain the proper quantity throughout the cooking process. Sufficient oil helps create a crispy exterior and ensures even cooking. Be mindful of the oil temperature as well to prevent greasy latkes.
With these tips and tricks, you’ll be well on your way to making deliciously crispy latkes for any occasion. Enjoy!
Secrets to Crispy Latkes
Achieving perfectly crispy latkes requires effective techniques for moisture removal from the grated potatoes and onions. Excess moisture can prevent the latkes from achieving that desired crispiness. There are a few tried and true methods to ensure your latkes come out crispy and golden brown every time.
1. Squeezing Out Moisture
One technique is to squeeze out as much moisture as possible from the grated potatoes and onions. This can be done by using a fine mesh sieve or cheesecloth to firmly press out the moisture. By removing excess moisture, you create a better environment for the starches to crisp up during frying.
2. Pressing Shreds Against a Colander
Another method involves pressing the shredded potatoes against a colander or using the Greatest Latke Trick of All Time. To perform this trick, bundle the potato shreds in cheesecloth, then twist it tightly to force out the moisture. As the moisture is pressed out, the starch is released from the potatoes. Collect the released starch and set it aside for later addition to the latke mixture. The collected starch contributes to the crispiness of the latkes.
3. Proper Draining and Starch Addition
Draining the grated potatoes and onions thoroughly is crucial to remove any excess moisture. This can be done by placing them in a colander and allowing the moisture to drain away. Once drained, add the collected starch back into the mixture. The starch acts as a binding agent and contributes to the crispness of the latkes during frying.
By implementing these secrets to crispy latkes, you can elevate your potato pancakes to a new level of deliciousness. The combination of effective moisture removal, pressing techniques, and proper starch addition will result in latkes with a perfectly crispy exterior and a tender interior.
Choosing the Right Oil for Frying Latkes
When it comes to frying latkes, selecting the right oil is essential for achieving perfect results. The oil you choose can greatly impact the flavor and texture of the latkes. Two excellent options to consider are canola oil and peanut oil.
Canola oil is a popular choice for frying latkes due to its high smoke point. The smoke point of an oil is the temperature at which it starts to break down and produce smoke. Canola oil has a high smoke point, allowing you to fry the latkes at high temperatures without compromising their flavor or burning the exteriors.
Peanut oil is another great option for frying latkes. It also has a high smoke point, making it suitable for high-temperature frying. Peanut oil is known for its neutral flavor, so it won’t overpower the taste of the latkes.
While olive oil is suitable for frying in general, it may not be the best choice for latkes due to its distinct flavor profile. Olive oil has a lower smoke point compared to canola oil and peanut oil, which means it’s more prone to burning the exteriors of the latkes before they are fully cooked. However, it’s worth mentioning that some traditional recipes do use olive oil for frying latkes, particularly among the Roman Jews.
Ultimately, the choice between canola oil, peanut oil, or olive oil comes down to personal preference. If you prefer a neutral-flavored oil with a high smoke point, canola oil or peanut oil is the way to go. However, if you enjoy the distinct flavor of olive oil, you can certainly give it a try. Experiment with different oils to find the one that suits your taste and yields the best results for your latkes.
Quick summary:
- Canola oil and peanut oil have high smoke points, making them great options for frying latkes.
- Olive oil, while suitable for frying in general, may not be the best choice for latkes due to its lower smoke point.
- Choose the oil that suits your taste and yields the best results for your latkes.
Equipment Recommendations for Latke Making
Having the right equipment can make the latke-making process easier and yield better results. Here are some essential tools to have in your kitchen:
1. Cast Iron Skillet
A cast iron skillet is recommended for frying latkes due to its superior heat retention and ability to produce a deep, burnished crust. Its even heat distribution ensures that the latkes cook evenly and develop a delicious golden brown color.
2. Food Processor with a Grating Disk
A food processor with a grating disk is an invaluable tool for creating large, firm shreds of potatoes. The grating disk produces consistent results and saves time compared to hand-grating. It ensures that the potatoes are evenly grated, resulting in perfectly textured latkes.
3. Box Grater
If a food processor is not available, a box grater can be used as an alternative for grating the potatoes and onions. It provides the same function of creating thin, uniform shreds that are ideal for latke-making. However, it may require a bit more effort and time compared to using a food processor.
With these essential equipment pieces, you’ll be well-prepared to make delicious latkes that will impress your family and friends.
Preparation Tips for Easy Latke Making
Being organized and prepared before starting the latke-making process can greatly simplify the cooking process. Here are some helpful tips to ensure a smooth and efficient latke-making experience:
1. Pre-chopping Onions
Begin by pre-chopping the onions and setting them aside. Onions add flavor to the latkes but can release excess moisture during the cooking process. To prevent soggy latkes, it’s important to thoroughly drain the chopped onions before incorporating them into the latke mixture.
2. Draining Rig
Prepare a draining rig to remove excess moisture from the latke mixture. This can be done by layering a sheet pan with paper towels or a clean kitchen towel. As you grate the potatoes, place the shreds on the draining rig, allowing any excess moisture to be absorbed.
3. Pre-measuring Ingredients
To streamline the cooking process, pre-measure all the necessary ingredients. This includes the matzo meal or potato starch, spices, and any other seasonings. Having everything pre-measured and readily accessible will save time and ensure that you have all the ingredients you need at your fingertips.
4. Shredding Potatoes Last
When it comes to shredding the potatoes, it’s best to do this step last. Potatoes tend to brown quickly once they are shredded, so by saving this step for the end, you can minimize discoloration and preserve the vibrant appearance of your latkes.
By following these preparation tips, you’ll set yourself up for success in making easy and delicious latkes. So go ahead, pre-chop those onions, set up a draining rig, pre-measure ingredients, and save the potato shredding for the final stretch. With these steps in place, you’ll be ready to create a batch of perfect latkes.
Cooking Techniques for Perfect Latkes
When frying latkes, it’s important to pay attention to various cooking techniques to ensure they turn out perfectly. Here are some tips to help you achieve delicious, crispy latkes:
- Oil temperature testing: Before adding the entire batch of latke mixture to the pan, it’s crucial to test the oil temperature. To do this, place a small piece of the potato mixture in the oil. If it sizzles and becomes golden quickly, the oil is at the right temperature for frying the latkes.
- Seasoning testing: To ensure your latkes are well-seasoned, it’s a good idea to make a test latke before frying the entire batch. Taste the test latke and check for proper seasoning, especially salt. Adjust the seasoning if necessary to enhance the flavors of the latkes.
- Size considerations: While size preference for latkes may vary, it’s important to keep in mind that latkes that are too large or thick may not cook through evenly. Aim for latkes that are of manageable size to ensure they are cooked properly and have a uniform texture throughout.

By following these cooking techniques, you can achieve perfectly cooked and flavorful latkes that are sure to impress your family and friends!
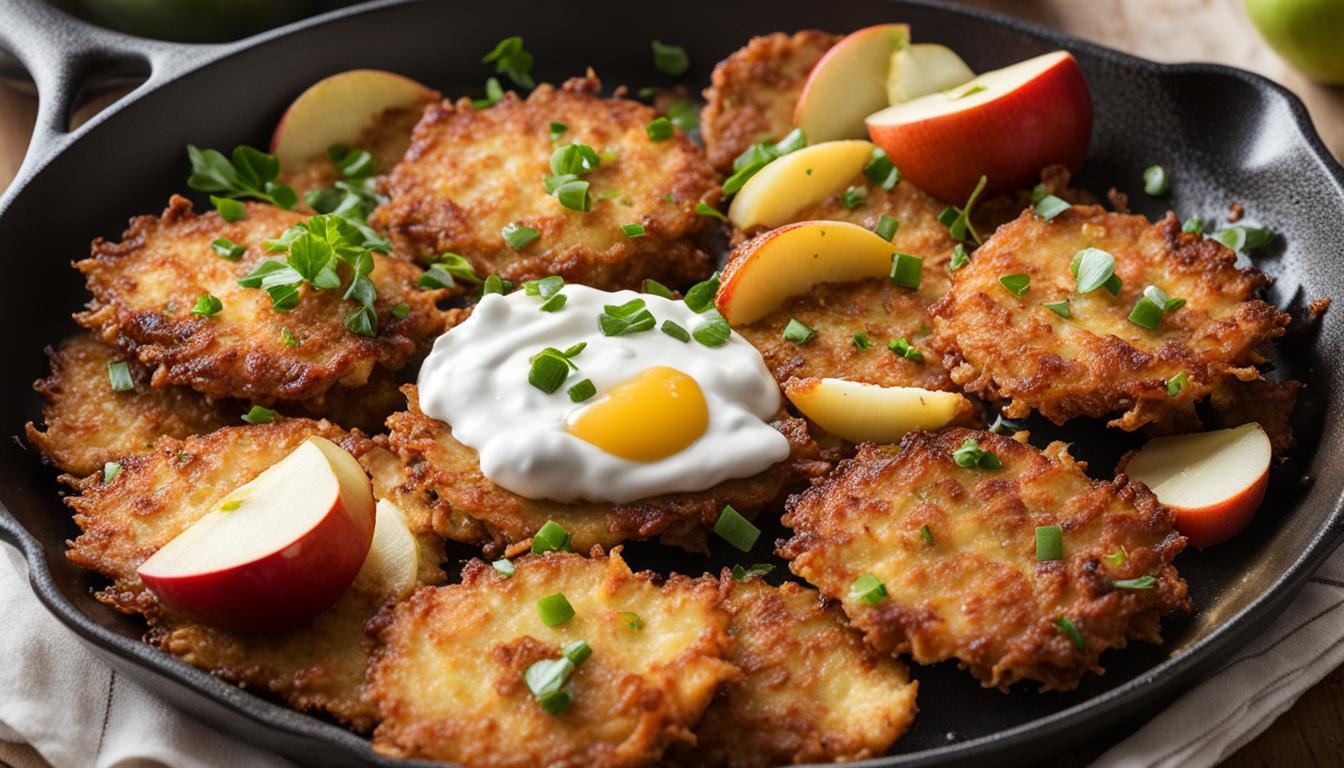
Serving and Storing Latkes
Once your delicious latkes are perfectly cooked, it’s time to think about how to serve and store them. Traditionally, latkes are served with a variety of toppings such as tangy sour cream, sweet applesauce, or creamy Greek yogurt. These toppings complement the crispy texture and rich flavors of the latkes. However, don’t feel limited to just these options – get creative and try garnishing your latkes with refreshing tzatziki, flavorful fruit chutney, or even a simple slice of creamy avocado.
Latkes are best enjoyed when served hot, straight from the frying pan. However, if you have leftovers or want to prepare them in advance, don’t worry! You can easily reheat latkes in the oven or toaster oven at a low temperature to ensure they stay crispy on the outside and warm on the inside. Simply place them on a baking sheet and heat them for a few minutes until they are heated through.
If you find yourself with more latkes than you can eat in one sitting, you can store them for future enjoyment. In the refrigerator, latkes can be kept for up to 2 days. Ensure they are stored in an airtight container to maintain their freshness. If you want to keep latkes for a longer period, they can be frozen for 2 to 3 weeks. To reheat frozen latkes, preheat your oven and place them on a baking sheet. Bake them for a few minutes until they are heated through and ready to be enjoyed once again.