Do you find yourself struggling with dull knives in the kitchen? Are you tired of the frustration and danger they pose? We all know that a sharp knife is essential for efficient cooking, but do you know the most effective method for sharpening it?
In this article, we will delve into the world of knife sharpening and explore the best techniques to bring your knives back to their razor-sharp glory. Prepare to challenge your preconceived notions and discover the truth behind the most popular methods. Are you ready to become a master of knife sharpening?
Key Takeaways:
- Sharpening a knife is an essential skill for anyone in the kitchen.
- Using an electric sharpener may not be the best option due to potential issues with balance and longevity of the knife.
- Professional sharpening services can be a good option if you find a reputable sharpener who uses suitable techniques.
- The most effective method for sharpening a knife is using a sharpening stone, such as a whetstone.
- Proper technique and regular maintenance are key to keeping your knives in optimal condition.
Why You Shouldn’t Use an Electric Sharpener
When it comes to sharpening your knives, it’s tempting to reach for the convenience of an electric sharpener. However, while they may seem like a time-saving solution, electric sharpeners come with their own set of drawbacks that can impact the overall quality and longevity of your knives.
One of the main concerns with electric sharpeners is that they remove a significant amount of material from the knife’s edge. This excessive removal can throw off the balance of the blade and render certain knives useless. Additionally, the edge produced by an electric sharpener is often adequate but lacks the precision and sharpness that can be achieved with other methods.
Another downside of electric sharpeners is that they can wear down the blades faster, leading to more frequent replacement of your knives. This can be costly and inconvenient in the long run.
Instead of relying on electric sharpeners, we recommend exploring alternative methods that provide better results and promote the long-term maintenance of your knives.
“Electric sharpeners remove a lot of material from your knife’s edge, which can throw off the balance and render certain blades useless.”
“They only provide an adequate edge and may require frequent replacement of your knives.”
The Benefits of Using Manual Knife Sharpening Tools
Manual knife sharpening tools, such as sharpening stones, offer more control and precision in maintaining the sharpness of your knives. By using these tools, you can achieve a razor-sharp edge that enhances the cutting performance and longevity of your blades.
One of the key advantages of manual sharpening tools is the ability to choose the sharpening angle according to your specific needs. This allows for customization based on the type of knife and desired cutting tasks.
Furthermore, manual sharpening methods, like using sharpening stones, remove a minimal amount of material, preserving the overall structure and balance of the knife. This ensures that your knives maintain their original quality and performance for an extended period.
DIY Knife Sharpening Guides for Optimal Results
To achieve the best results with manual knife sharpening tools, it’s essential to follow proper techniques and guidelines. Here are some DIY knife sharpening tips to help you get started:
- Selecting the right sharpening stone: Choose a sharpening stone with a medium grit for major sharpening jobs and a fine grit for a razor-sharp finish.
- Soaking the stone: Soak the sharpening stone in water for at least 45 minutes before using to ensure proper lubrication and prevent damage to the stone or knives.
- Maintaining the correct angle: Hold the knife at a 15- to 20-degree angle, maintaining consistency throughout the sharpening process.
- Proper stroking technique: Drag the knife across the stone, starting from the heel and moving towards the tip, with even pressure and controlled movements.
- Flipping and repeating: Flip the knife and repeat the sharpening process on the other side to ensure a balanced edge.
- Refining the edge: Finish the sharpening process by using a finer-grit stone to refine the edge and achieve optimal sharpness.
By following these DIY knife sharpening guides, you can effectively sharpen your knives, ensuring superior cutting performance and prolonging their lifespan.
| Electric Sharpener | Manual Sharpening Tools |
|---|---|
| Removes excessive material from the knife’s edge | Removes minimal material, preserving the knife’s structure |
| Produces an adequate edge | Creates a razor-sharp edge |
| May require frequent knife replacements | Prolongs the lifespan of your knives |
| Lacks precision and customization | Allows for angle customization and control |
The Pros and Cons of Professional Sharpening Services
When it comes to keeping your knives sharp, professional knife sharpening services can be a convenient option. If you have a reliable sharpener nearby and don’t mind paying for regular sharpening, it can save you time and effort in maintaining your knives. However, it’s important to consider the pros and cons before entrusting your precious blades to a professional.
Pros of Professional Sharpening Services:
- Convenience – A professional sharpener has the expertise and tools to sharpen your knives efficiently and effectively.
- Accuracy – They are trained to maintain the correct sharpening angle, ensuring optimal blade performance.
- Specialized Equipment – Professional sharpeners often use high-quality sharpening systems and tools, producing consistent and precise results.
- Time-Saving – If you have a busy schedule or lack the confidence to sharpen your knives on your own, professional services can save you valuable time.
Cons of Professional Sharpening Services:
- Cost – Professional sharpening services typically come with a price tag, especially if you require frequent sharpening sessions.
- Dependency – Relying on professional sharpeners means you may need to wait for your knives to be sharpened, leading to potential inconvenience.
- Potential for Material Removal – Some sharpeners may use grinding stones that remove excess material from your knife. This can reduce the lifespan of your blade.
- Lack of Control – When you sharpen your own knives, you have complete control over the process. With professional sharpening services, you rely on the skills and judgment of the sharpener.
“Handing over your knives to a professional for sharpening can be a convenient option, but it’s essential to choose a reputable sharpener who can deliver reliable results.”
Pros and Cons of Professional Sharpening Services
| Pros | Cons |
|---|---|
| Convenience | Cost |
| Accuracy | Dependency |
| Specialized Equipment | Potential for Material Removal |
| Time-Saving | Lack of Control |
It’s important to find a reputable sharpener who understands the complexities of different types of knives and uses the appropriate tools and techniques. Be sure to communicate your specific requirements and expectations to ensure the best results for your knives.
Next, we’ll explore the best method for sharpening your knives – using a sharpening stone.
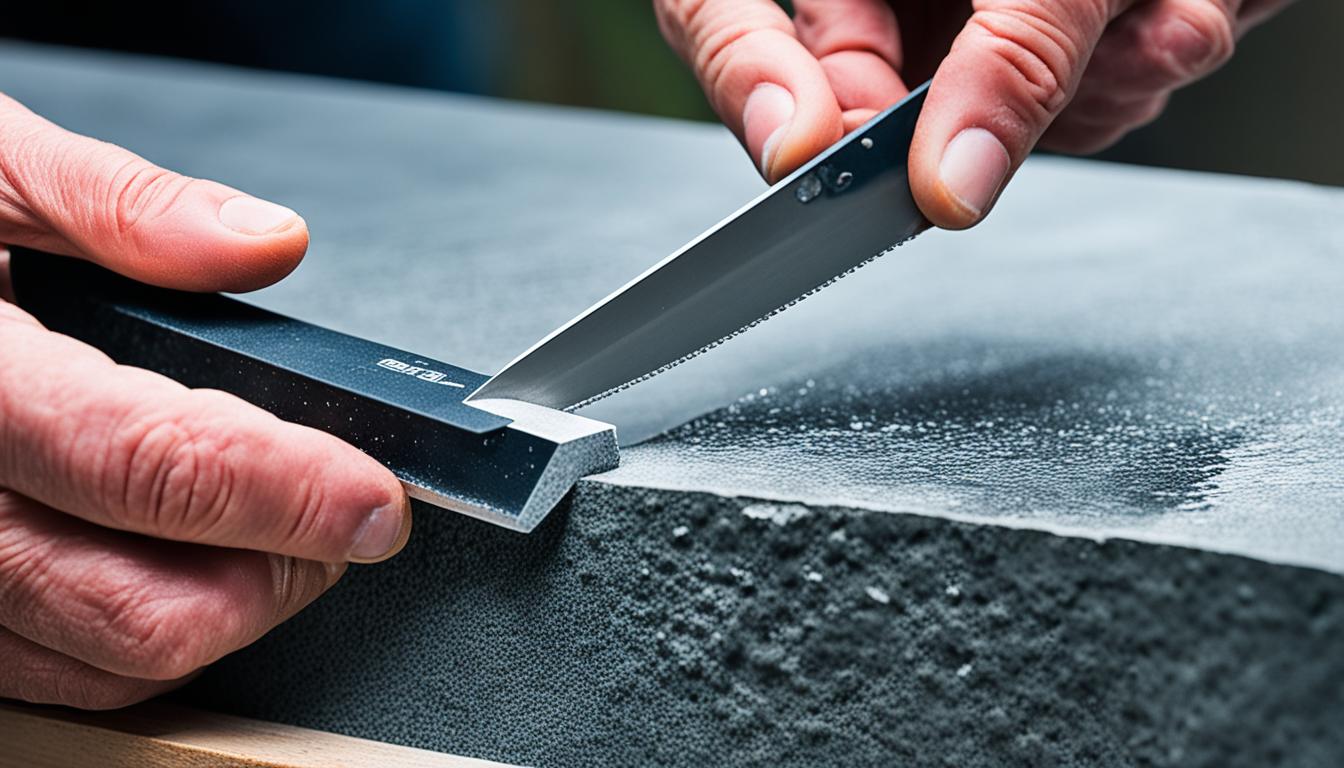
The Best Method: Using a Sharpening Stone
When it comes to sharpening a knife, using a sharpening stone is the most effective method. Not only does it provide the best edge, but it also removes the least amount of material from the blade. Whetstones, also known as waterstones, are the preferred type of sharpening stone.
When selecting a sharpening stone, it’s essential to choose one with the right grit for your needs. For major sharpening jobs, a stone with a medium grit is ideal. This grit level helps to shape the blade and remove any nicks or imperfections. To achieve a razor-sharp finish, a stone with a fine grit should be used.
Learning the proper technique for sharpening a knife with a stone is crucial. It’s not just about running the blade across the stone; it’s about maintaining the correct knife sharpening angle and applying consistent pressure. Practice is key to achieving the best results.
To visualize the process, here is a step-by-step guide on how to sharpen a knife with a stone:
- Place the sharpening stone on a stable surface and ensure it is well-moistened to prevent damage to the blade.
- Hold the knife at a 15- to 20-degree angle against the stone.
- Starting from the heel of the blade, drag the knife towards the tip in a smooth motion, maintaining consistent pressure.
- Repeat this motion several times, alternating sides of the blade, until a burr forms on the opposite side.
- Flip the knife and repeat the process on the other side.
- Finally, refine the edge with a finer-grit stone for a razor-sharp finish.
By following these steps, you can ensure that your knives are sharpened effectively and maintain their longevity. Sharpening with a stone allows for precision and control, giving you the confidence to tackle any cutting task in the kitchen.
| Advantages of Using a Sharpening Stone | Disadvantages of Using a Sharpening Stone |
|---|---|
| Provides the best edge | Requires practice to master the technique |
| Removes the least amount of material from the blade | Takes more time compared to other methods |
| Allows for precise control over the sharpening process | May require the purchase of additional grit stones for different levels of sharpening |

Using a sharpening stone is the preferred method for sharpening a knife. It offers the best edge and allows for precise control over the sharpening process. With practice and the right technique, you can maintain the sharpness and longevity of your knives. Remember to choose the appropriate grit stone and follow the recommended knife sharpening angle for optimal results.
Choosing the Right Sharpening Stone
When it comes to sharpening your knives, having the right tools is essential. One of the best ways to sharpen a knife is by using a sharpening stone. But with so many options available, how do you choose the right one? In this section, we’ll guide you through the process of selecting the perfect sharpening stone for your needs.
Size Matters
When buying a sharpening stone, size matters. Look for a stone that is large enough to comfortably sharpen your knives. Ideally, it should be around two-and-a-half inches wide by eight inches long and about an inch in thickness. This size provides enough surface area to accommodate most blade lengths and allows for smooth and efficient sharpening.
Grit Size
Sharpening stones come in various grit sizes, which determine the coarseness of the stone and the type of edge it will produce. Lower grit numbers, such as 200 or 400, are coarser and are perfect for repairing chips or reshaping damaged blades. Higher grit numbers, like 1000 or 3000, provide a finer edge and are ideal for honing and refining the sharpness of your knives.
It’s recommended to have at least two sharpening stones in your kit. A stone with a medium grit, around 600 to 1000, will be useful for more significant sharpening jobs. A stone with a fine grit, ranging from 2000 to 3000, will give your knives a polished and razor-sharp finish.
The Best Sharpening Stone for You
Choosing the right sharpening stone may seem daunting, but it doesn’t have to be. Consider your sharpening needs and the types of knives you own. If you have a collection of kitchen knives that require regular maintenance, investing in a combination sharpening stone with both medium and fine grits might be your best bet.
On the other hand, if you have specific knives, such as hunting or outdoor blades, that need special attention, you can opt for individual sharpening stones tailored to their respective grit needs. By customizing your stone selection, you ensure that each blade receives the care and sharpening it requires.
Remember, the key to choosing the right sharpening stone is to match it to your specific needs and the knives you own. With the right stone in your arsenal, you can achieve professional-level sharpening results in the comfort of your own home.
Proper Technique for Sharpening with a Stone
When it comes to knife sharpening, using a sharpening stone is the best method to achieve optimal results. Here, we will guide you through the proper technique for sharpening your knives using a stone.

Preparation
Before you begin sharpening, make sure to soak the sharpening stone in water for at least 45 minutes. This step ensures that the stone is properly saturated, allowing for smoother sharpening and preventing damage to the stone.
Positioning the Stone
Place a towel over a cutting board to create a stable surface for the stone. Position the wetted sharpening stone on top of the towel. Keeping the stone moistened throughout the process is important, as it helps maintain the effectiveness of the sharpening action.
Angle and Technique
Hold the knife at a 15- to 20-degree angle, ensuring that the blade’s heel makes contact with the stone. From the heel, gently drag the knife across the stone towards the tip, maintaining even pressure. Repeat this motion, alternating sides, until a burr forms on the opposite side of the blade.
Flipping and Repeating
Once a burr has formed, flip the knife, so the opposite side faces up. Repeat the same sharpening process on this side, again ensuring a consistent angle and applying even pressure. This technique helps achieve a uniform and sharp edge on both sides of the blade.
Final Touches
After sharpening both sides of the blade, it’s time to refine the edge further. Switch to a finer-grit stone and repeat the sharpening process, this time focusing on polishing the edge. This step will help achieve a razor-sharp finish and enhance the cutting performance of your knife.
“Proper technique and patience are key when sharpening with a stone. Take your time and maintain a steady hand to achieve the best results.” – Chef Samantha Davis
Remember, practicing the proper technique and maintaining the correct angle are crucial for successful sharpening. With practice, you’ll gain confidence and be able to restore your knives’ sharpness with ease.
| Benefits of Sharpening with a Stone | Limitations of Sharpening with a Stone |
|---|---|
|
|
Caring for Your Sharpening Stone
Proper maintenance of your sharpening stone is essential to ensure its longevity and effectiveness in keeping your knives sharp. Here are some knife maintenance tips to help you care for your sharpening stone:
Drying and Storage
After each use, carefully dry your sharpening stone to prevent water damage and rust formation. Use a clean kitchen towel to absorb any moisture on the stone’s surface. It’s important to store your stone in a dry and grease-free environment to maintain its quality.
Avoid Using Oil
While some sharpening stones may require the use of oil, most waterstones, commonly used for knife sharpening, do not. Applying oil on a waterstone can hinder its sharpening ability and affect the quality of your knife’s edge. Therefore, it’s best to avoid using oil on your waterstone.
Honing with a Steel
In addition to regularly sharpening your knives on a stone, it’s important to hone them with a steel before or after each use. Honing the knife helps maintain the alignment of the blade, ensuring optimal cutting performance. Learn the proper technique of honing with a steel to prolong the sharpness of your knives.
By following these knife maintenance tips and caring for your sharpening stone, you can ensure that it remains in excellent condition, allowing you to achieve razor-sharp edges on your knives whenever needed.
How to Hone a Dull Knife
Honing a knife is an essential step in knife maintenance that should be done regularly to keep the blade aligned. Unlike sharpening, which removes metal to create a new edge, honing realigns the existing edge, ensuring optimal cutting performance.
To hone a knife, you will need a waterstone and a stable surface. Before using the waterstone, submerge it in water for at least 45 minutes to ensure it is properly moistened.
Once the waterstone is ready, place it on a towel on a stable surface. Hold the knife at a 15- to 20-degree angle, ensuring a consistent angle throughout the honing process.
With even pressure, drag the knife across the waterstone, starting from the heel and moving towards the tip. Repeat this motion several times on each side of the blade, maintaining a smooth and controlled movement.
Honing should be done before or after each use of the knife to maintain its sharpness. Regular honing helps to keep the edge aligned, ensuring smooth and effortless cutting.

Remember, honing should not be confused with sharpening. Honing is a quick and easy process that helps to maintain the knife’s sharpness, while sharpening should be done periodically to actually remove material and create a new edge.
By incorporating honing into your knife maintenance routine, you can preserve the longevity and cutting performance of your knives, ensuring they stay sharp and ready for any kitchen task.
Alternative Method: Sharpening with Sandpaper and a Mousepad
While using a sharpening stone is the preferred method for sharpening a knife, there is an alternative technique that can yield a convex edge on the blade. This method involves using sandpaper and a mousepad, providing a DIY solution for those who may not have access to a sharpening stone.
To sharpen your knife using this method, you will need a piece of sandpaper and a mousepad. Start by cutting a piece of sandpaper that is wide enough to cover the mousepad. Attach the sandpaper to the mousepad securely, ensuring it does not move during the sharpening process.
You will also need sandpaper of different grits, starting with a lower grit and gradually progressing to finer grits for refinement. This allows you to achieve the desired level of sharpness for your knife.
To begin sharpening, hold the knife at a consistent angle and make passes on the sandpaper, alternating sides of the blade. The consistent angle is crucial for maintaining an even edge across the knife.
Apply moderate pressure, ensuring that the knife makes contact with the sandpaper throughout the entire motion. This will help raise a burr, which is a small metal ridge that develops along the knife’s cutting edge. The burr indicates that the sharpening process is effective.
Continue sharpening, alternating sides and raising a burr until you achieve the desired sharpness. It is important to maintain consistency and ensure that both sides of the blade are equally sharpened.
Remember to take breaks to allow the sandpaper to cool down, as excessive heat can affect the overall quality of the sharpening process.
Once you have attained the desired sharpness, remove the burr by making a final pass on a finer-grit sandpaper. This will refine the edge and result in a razor-sharp knife.
Alternative Method: Sharpening with Sandpaper and a Mousepad – Step by Step
- Cut a piece of sandpaper wide enough to cover a mousepad.
- Attach the sandpaper securely to the mousepad.
- Select sandpaper with different grits, starting with a lower grit and progressing to finer grits.
- Hold the knife at a consistent angle and make passes on the sandpaper, alternating sides of the blade.
- Apply moderate pressure to raise a burr along the cutting edge.
- Continue sharpening, alternating sides and raising a burr until desired sharpness is achieved.
- Allow breaks for the sandpaper to cool down.
- Make a final pass on a finer-grit sandpaper to refine the edge and remove the burr.
Using sandpaper and a mousepad as a knife sharpening method provides an accessible and affordable option for maintaining the sharpness of your blades. However, it may not yield the same level of precision and consistency as using a sharpening stone.
If you have access to a sharpening stone, we recommend using that as the primary method for sharpening your knives. The sandpaper and mousepad technique can serve as a temporary solution or an alternative when a sharpening stone is not readily available.
Tips for Maintaining a Sharp Knife
We all know that a sharp knife is essential in the kitchen. To ensure your knife stays razor-sharp and ready for all your culinary adventures, here are some important tips for knife maintenance:
- Avoid cutting on hard surfaces like glass or ceramic, as they can dull the blade. Stick to cutting boards made of wood, bamboo, or plastic to preserve the sharpness.
- After each use, clean your knife with mild soap and water, ensuring any food residue is removed. Dry it thoroughly to prevent corrosion.
- Proper storage is key to maintaining the edge of your knife. Consider investing in a knife block or keeping your knife in a protective sheath. This will not only prevent accidental cuts but also protect the blade from getting damaged.
- Regular honing is essential to maintain the sharpness of your knife. Use a honing rod or sharpening steel to realign the edge of the blade, keeping it in optimal cutting condition.
- When you notice that your knife is losing its sharpness, it’s time for sharpening. Follow the proper technique for sharpening with a stone to restore the edge and cutting ability. Refer to Section 4: The Best Method: Using a Sharpening Stone for detailed instructions.
Remember, a well-maintained knife not only makes your cooking experience safer but also enhances your precision and efficiency in the kitchen.
Conclusion
Sharpening a knife is an essential skill for every cook. Whether you’re a professional chef or a home cook, maintaining a sharp knife is crucial for effective and safe food preparation. While there are various methods available, using a sharpening stone is the best way to achieve optimal results.
A sharpening stone provides excellent control, allowing you to sharpen your blade at the precise angle needed for your specific knife. This method removes minimal material from the blade, ensuring a longer lifespan for your knives. Investing in a good quality sharpening stone and practicing the proper technique will enable you to achieve a razor-sharp edge every time.
Regular maintenance and honing are also essential for keeping your knives in top condition. Honing should be done before or after each use, while sharpening may be required periodically as needed. By following these knife maintenance practices, you can extend the lifespan of your knives and enjoy the benefits of a sharp cutting edge for all your culinary endeavors.